Sunday, August 25, 2013

Chima and Chocolate


NOTE: Sara’s blog has moved to a new location: http://saraelizabethcakes.com. Feel free to browse around my tutorials here, then come check out my new site!


I'm glad to know my 9 year old is not the only one obsessed with Legos. It used to be Lego Ninjago. Now it's on to Lego Chima. I have no idea what exactly Chima is . . .  I'm not sure my 9 year old does either. All I know that Lego Creators and Marketers are genius, due to the response. And, I'm happy to see my boys self-entertaining with imaginative play and building!


This cake was commissioned for a darling 6 year old Chima fanatic. His mother wanted a cake on which she could place his gift: Chima figurines. There wasn't much out there as far as design ideas for me to pull from, since Chima is relatively new. So, I'm happy to say, this design is 100% original! And had me stumped for a while . . .


I opted to pipe the wording over a template, rather than try to cut fondant around a template. I love this simple, sure-fire technique.

  1. Print off your logo or wording, place it on a firm cutting board, tape wax paper over it
  2. Choose your color of Wilton (etc) candy melts, place several in a zip lock bag, and microwave in 10 second increments or less until melted and smooth.
  3. Snip a small hole in the corner of said zip lock bag
  4. Carefully pipe/trace over the wording onto the wax paper.
  5. Set aside to dry and harden until use.
Some people prefer to flip the wording backwards, then pipe, so that when you apply it to the cake the bumpy side sits in the cake, while the smooth surface faces out. I opted for the raised texture this time.

The cake was two 6" layers of chocolate cake, torted and filled with a fresh Raspberry Swiss Meringue Buttercream (a scrumptious buttery bit of heaven), per the mother's request. The exterior is a vanilla American Buttercream, with vines and leaves piped with the same. Leaves were done with the #18 Wilton leaf tip. 


The piece de resistance? Lego Chima itself--no modeling or fondant required. Doesn't get easier than that!  Present? Check. Cake? Check. 

I'm a fan!


All Natural Red Velvet Drum Cake

NOTE: Sara’s blog has moved to a new location: http://saraelizabethcakes.com. Feel free to browse around my tutorials here, then come check out my new site!


Wow. What a challenge! For her son's 14th birthday, this particular customer requested a life-like Drum Cake. The real kicker: she also wanted a dye-free red velvet cake. Always up for a challenge, I happily accepted.

After perusing  Pinterest and Google, I found 2 red velvet cake recipes that used beets for the signature red color. One that supposedly is a historic recipe dubiously from the Waldorf-Astoria Hotel, found here,  and another "All Natural Red-Velvet Cake" found here. I tested them both. Allow me to save you some trouble. Do NOT even bother with the first recipe! Unless you love a brown beet-cake that sinks at high altitude (I bake at an elevation of 4300 ft).  However, the 2nd recipe, by Merissa at Little House Living, was bright red and quite remarkable. Both call for beets--I used fresh, oven-roasted beets pureed in a processor for both recipes. Both batters were identically beautiful.


Apparently, for the beets to maintain their amazing red color, you have to have an acidic batter. Little House Living's did by incorporating vinegar and orange juice, while the "Waldorf Astoria's" did not. That made the difference between a brown cake, and a gorgeous, red-velvet-RED cake upon baking. I threw out the brown cake -- no photos of that one. Trust me, it wasn't worth it, based on both looks and flavor! It tasted like beets. Enough said.

Little House Living's recipe didn't exactly taste like Red Velvet. Not that Red Velvet cake has much of a signature taste to begin with. But, it did have a deep, sweet, slightly fruity, with a hint of chocolate flavor. And maybe the tiniest of beet aftertastes, which concerned me.  But, it's made from beets. What can you expect? The true test: My kids loved it! They usually get my scraps, which is what they're chowing down on here:


I would say that the beet aftertaste deepened a bit over time. I bake my cakes a couple days in advance, freezing them soon after coming out of the oven to preserve moisture and enhance flavors. I don't think I would do that again with this cake. it was plenty moist already, and the earthy flavors are best fresh, without having time to percolate. 

After filling the 8" layers with a shelf-stable cream cheese frosting, and giving it an all-over coat of a light vanilla Swiss Meringue Buttercream (excellent under fondant!), we were ready to move on to decorating!

The drumsticks were made out of Wilton Gumpaste mixed with homemade Marshmallow Fondant + Tylose powder. The Tylose helps the fondant to set up hard, which is what you want for details like this. The fondant/gumpaste was colored brown, shaped, and set aside. After drying, I used a cakes-only paintbrush to apply a brown edible coloring dust. I barely dipped my brush in water and gently went over the entire stick, which gave it it's more streaky coloring as well as adding a lasting sheen. The drumsticks needed a few days to harden well, so I made those about 5 days in advance.


The rest: tedious detail after detail. The hinges (that's not what they are, but you get the idea) of the drum, as well as the pole-looking peices were all made out of the same gumpaste/fondant mixture as the drumsticks.  The top of the drum is Satin Ice fondant, in order to achieve a true white color. The black fondant is Duff Fondant. Coloring my own black fondant is not worth the time or food coloring. Black (and red fondant) is worth purchasing in my humble opinion!


My gold and silver colors were achieved with Luster Dust mixed with a clear vanilla extract for painting, once I'd applied all of the fondant onto the cake. The writing is a simple white royal icing.

All Natural Red Velvet Drum Cake. Success! 


Monday, August 19, 2013

Sasquatch Sighting! Or just a Bigfoot Cake.

NOTE: Sara’s blog has moved to a new location: http://saraelizabethcakes.com. Feel free to browse around my tutorials here, then come check out my new site!


Okay. Disgusting. Who would want to cut into a slice of this? Hairy, dirty, Bigfoot toes . . .   Yum.  But, I LOVE this cake!  I was so thrilled with the final result. There's nothing better than having a cake turn out better than you had anticipated, which this one did.  

One of my favorite thing about cake decorating, is that customers always surprise and challenge me with their requests, particularly when it comes to 3D cakes. It's never the same. And for someone like me who tends to get bored easily, this is a delightful thing!

This particular cake was a surprise commissioned by a devoted wife for her Sasquatch-loving husband. If this isn't supporting your spouses hobbies and passions, I don't know what is.

 Let's get to the tutorial:

The base of this cake is a denser chocolate cake, baked in a 10" square pan and frozen. I drew the foot shape onto paper, then used it as a template to cut out the outline. I used a piece of cake scrap carved from the side of the cake, and added it to the heel of the foot for extra length. Freezing the cake makes it easier to carve, particularly those small toes, little by little--which is the tricky part. I went oh-so-slow, making sure to put as much detail as the cake would allow. After a layer of buttercream and fondant, it's easy to lose the details.

After carving the cake, it had defrosted, so I gently sliced it in half, length-wise, filling it with a layer of home-made, real chocolate buttercream (melted chocolate added to my buttercream recipe--delicious!). Using the same recipe, I carefully frosted the rest of the cake. First with a light crumb-coat, chilling the cake to help it set up firm, then with another layer. I needed every bit covered, so I used my small pallet knife that comes in the Wilton Fondant Tool Kit. it was perfect for getting in all the nooks b/w and around the toes. Each time, careful to preserve as much as the shape as possible. 


After it had chilled again, I used a Viva paper towel (no pattern) on the cake, gently using my fingers over the paper towel to smooth out as much of the ridges and marks as possible, so as to have a smooth base for the fondant.


Here you can see the before and after. Not a huge difference, but when it comes to fondant, the smoother your base is, the better the end result.


Here you can see the detail I tried to maintain. Indentions for the toenails and crevices between and around the toes.


 Next comes the fun part. Using Marshmallow Fondant, I used the Wilton Ivory food coloring gel, with a touch of Red, to achieve a flesh-colored tone. Measuring the foot, I rolled out an appropriate size, and covered the foot, using my fondant tools to gently create the shapes and indentions. Trim off the extra, and it's done! I tried to conserve fondant and achieve a dark base for the hair by leaving part of the frosting bare. I wouldn't do that again; it worked well, but left the back of the foot shorter than the front by a bit, almost creating a slipper-like shape. Not a big deal, but since I'm a perfectionist . . .


Toenails: Simply get out your Wilton white gumpaste, add the smallest touch of ivory, and cut out the shape using an X-acto knife or a small Fiskers finger rotary cutter (one of my favorite tools!). I measured the shapes against the toes, trimmed them to fit curved them a bit and left them on the counter to dry for a few minutes. I've decided mine are a little too manicured for a monster, but they'll do.  I used a Brown Wilton Edible Color Dust  to give them a woodland-monster touch, attaching them, I used my Wilton Piping Gel. Easy Peasy.


In what was possibly the best touch, I used the Wilton Brown Dust and a paint brush to go around the bottom of the foot, under the toenails, and in between the toes to give it some life.


Finally, use your chocolate buttercream and a "Grass" piping tip to pipe on the "fur". Or does the Sasquatch have hair?


Finished! One authentic dirty big foot. This finished cake was about 9" wide and 13" long. Hopefully it looks like it came from Bigfoot. I've gotten more comments that says it looks like a Hobbit's foot. I think eating a Hobbit's foot is even worse. Either way, it's the most delicious foot I've ever seen. A whole new meaning to "Foot Fetish!"


Sunday, August 18, 2013

Cruisin' Cake


NOTE: Sara’s blog has moved to a new location: http://saraelizabethcakes.com. Feel free to browse around my tutorials here, then come check out my new site!


Aaah, cruises. Is there anything better than floating on the ocean, every wish catered to: unlimited food, nightly dining and entertainment, not to mention daily housekeeping provided? While I'm more of a "get out and explore the local color" kind of person, there is certainly a place for the mindless, carefree luxury that a cruise ship can provide.

These are the things rolling through my head as I assembled this cake. It brought back some wonderful memories of the one cruise I've been on. Snorkeling, too many desserts, card games on the deck, motorcycling on Cozumel wearing the nastiest smelling rental helmet, beyond what you can imagine. I digress: this cake was ordered for my customer's mother's birthday (confusing?) who was also soon to leave on a much anticipated Disney Cruise.

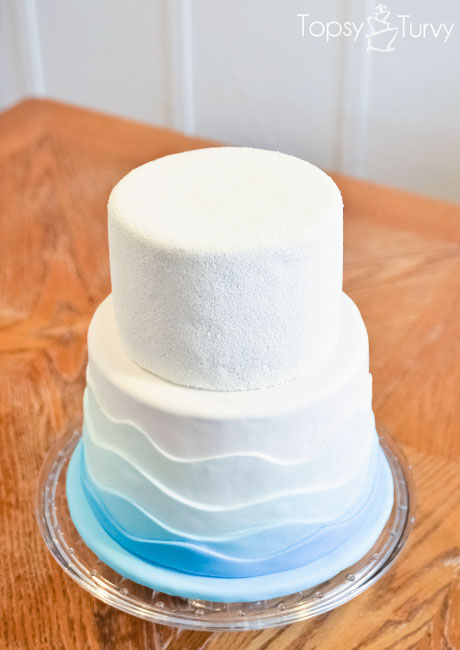
After searching through numerous google and Pinterest images of ocean/cruise/Disney-themed cakes for inspiration, I landed on a favorite by the talented Ashlee at Topsy Turvy:
 http://www.imtopsyturvy.com/nonperil-fondant-birthday-cake-pool-party/

Beautiful, right? I love the refreshing, cool, textured simplicity of it. I decided to combine her basic design elements into one cake, adding in a cruise ship and improvising some fireworks (a signature of the Disney cruise experience).  I love how it turned out! (Kudos to Ashlee for the original idea and inspiration).

Gumpaste takes a couple days to completely harden, so to begin, what I SHOULD have done was model my cruise ship a few days in advance. Instead, I modeled it the same day that I assembled my cake. It worked, but was still soft while I was taking it on and off the cake, resulting in a little compressing on the sides where I held it. I referred to photos of the actual Disney ship in order to create a very loose translation. I used gumpaste for the main structure, and pre-colored Duff fondant to add the black shell around the hull and the red and black smoke-stacks (another Disney ship signature--if that's what those things are?)  The smoke stacks were tricky! I must have squashed those tiny things 10 times each while trying to attach them with Wilton Piping Gel. If I had done them in advance, I could have let them dry before attaching them to the main body, which would have been MUCH easier. So much of good cake decorating has to do with timing! I also used Wilton Edible Markers to imply windows on the boat.


To prepare the cake, I frosted my chilled cakes, then covered them in white fondant--a 50/50 mix of homemade Marshmallow Fondant (MMF) and pre-made Satin Ice Fondant. The Satin ice is a truer white, and is easier to manage, I find. The MMF is inexpensive, readily available, but also a little softer and stickier to work with. The blend worked perfectly.


I then used a cake-only paintbrush to lightly brush on the thinnest coat of water, and doused it with Wilton white non-pareils (a fancy name for sprinkles), pressing down lightly with my hand to make sure they adhered, then using a larger, soft brush to whisk away extras. A messy job. I ended up sweeping sprinkles off my floor for days, despite my best precautions.


Originally, I had thought that I would only coat the top with sprinkles, so I stopped there at this point.


Up next: fireworks. I knew these needed a little time to harden, so using red fondant, my Wilton Star-shaped cutter, and some white floral wire, I cut out the stars, applied water to one side as it lay face-down on the counter, laid the wire on it, then brushed another star with water and laid it on top. Fondant/wire cookie, done!


I don't have photos of the next step, as it was more involved--apply the waves is where I crossed my fingers and held my breath that the fondant wouldn't stretch or tear while I worked with the long strips. I colored my fondant by using Marshmallow Fondant, some pre-colored Duff fondant, and some food coloring till I achieved the darkest hue I wanted.  Taking two pieces of that color, and then worked in varying quantities of white MMF to achieve my other two desired hues, creating an ombre effect.


I attached them to the fondant-covered cake by applying water lightly to the back of each, building each layer on top of the other, from top to bottom. The top blue layer extends all the way down to the cake board (which, BTW, should be prepared first along with the gumpaste ship to allow it time to harden).  I quickly realized the cake would look SO much better if I applied sprinkles to the sides, so I did that the same way as I did the top. Unfortunately, at this point my fondant on my cake had hardened to an extent that the water didn't make it sticky enough--hence the splotchy covering. I also tried the Wilton Piping gel,  but they didn't want to stick well to that, either. I wasn't thrilled with it, but the overall effect was still pleasing. I'm still thinking on how to do that better next time! Working faster?


For the grand finale, I used white chocolate (melted) to adhere the ship to the cake, clipped the firework wires to the desired heights, and stuck them into the gumpaste. I know this is self-explanatory based on the photos, but just so there's no room for questions . . . 


TaDa!!! One lovely, subtle Disney-ish Cruise Cake on it's way!